DIY Rustic Wood Sign: Beginners Wood Burning Tutorial
This is a sponsored conversation written by me on behalf of Hobby Lobby. The opinions and text are all mine.
If you’ve been following along on my Instagram, you know that several big life changes happened over the past few weeks and months. First, we’re pregnant (!!) and expecting a baby girl in a few months.
And second, we moved all the way across the country, from coast to coast. So what does this all mean?
I haven’t been able to do lots of the DIY things I love because they’re either challenging when pregnant or because I’ve packed my tools away in boxes. You guys, I’ve been ITCHY to do some DIY!
So when this awesome opportunity came to partner with Hobby Lobby, I knew the DIY gods were speaking to me. I decided to dive into a new hobby and try out wood burning! And I love it! I


Gather the Supplies
In the woodpile section of Hobby Lobby, I found all the supplies I needed for this wood burning DIY. I loaded up with the following:
One medium sized birch wood slice
Two small birch wood slices
Versa tool wood burning tool
Hanging supplies
Design template

They had a few types of wood burning tools available, one for $30 (which I bought) and one for about half the cost. I decided to splurge on the more expensive one because it came with lots of cool interchangeable tips and had a dial to adjust the temperature. I ended up using the “flow tip” rather than the standard tip to complete this project.

Easy DIY Woodworking Projects & Ideas for Beginners!
Unlock your inner woodworking enthusiast with our ultimate guide on Easy DIY Woodworking Projects – packed full of ideas for beginners!
Whether you’re a seasoned DIYer or just starting out, this guide has something for everyone.
From simple yet stylish projects to helpful tips and tricks, get ready to embark on a creative woodworking journey.
Draft Your Design
Maybe you’re super ballsy and want to wood burn without a template? Me, not so much. I was really nervous to try wood burning because once you make a mistake, it’s pretty indelible. Usually, I use water based paint which is much more forgiving! So I knew I would need a design template to follow.
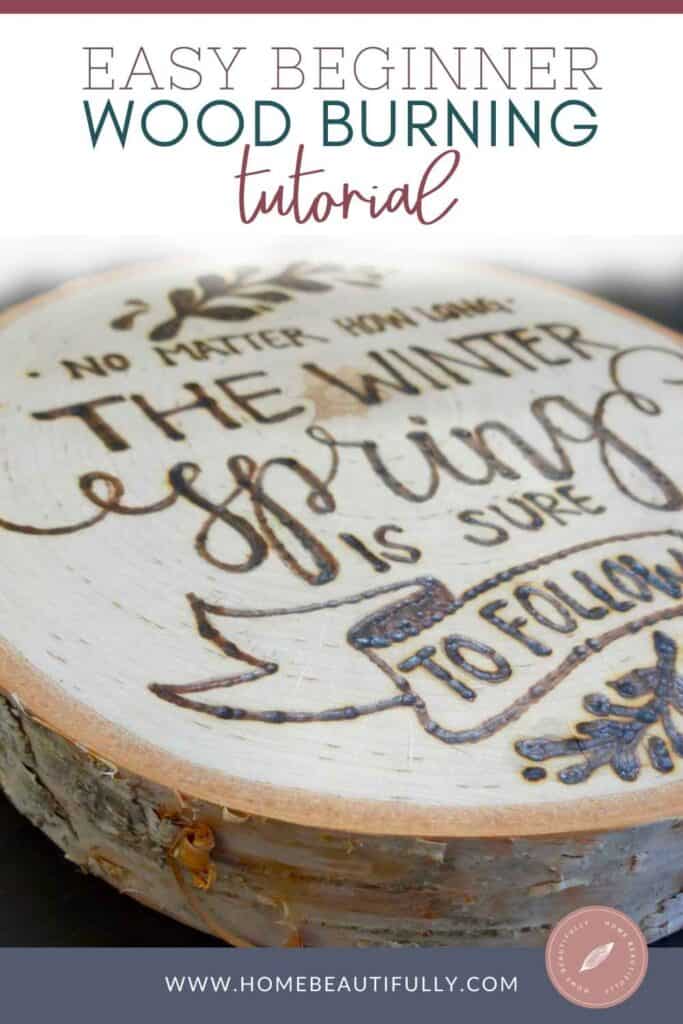
I found this super cute design that says “no matter how long the winter, spring is sure to follow” from The DIY Mommy. Best of all, she has a free gorgeous chalkboard printable to download if you just want to print this and frame it! Grab it here.
You have a few ways to transfer your design onto your wood piece. You can use carbon paper, you can trace over the image and dig it into the wood, or you can free hand it. I decided to free hand the image. And yes, I erased …a lot!


Burn, Baby, Burn
I had watched a whole lot of YouTube tutorials before I began and some friendly folks on Instagram gave me words of wisdom to get started. Here are some tips I found helpful as a beginner:
1. Use steady pressure for consistent color. The hotter the tool and the more pressure you use, the darker the wood will burn.
2. Stick with a simple design. I purposefully picked a template that was chalkboard art because I knew it would translate well in black and white. Online, there were so many cute design templates in color, but I wasn’t certain if they’d look good when burned.
3. Go slow. Wood burning is unforgiving. One mistake could wreck the piece! Unlike pencil or even paint, it’s hard to erase. Take your time and go slow. Plus, going slowly will ensure you use steady pressure. Also, going slowly will help you not to burn yourself. (I was afraid I would!)
4. Find the right tip for your tool. When I started the project, I used a standard tip that had an edge on it, kind of like a calligraphy nib. I found the tip hard to use because the edge kept getting stuck in the wood grain! When I switched to the flow tip, which had a smoother rounded point, the burning went much, much more easily. If your tool comes with multiple tips, play around.
Despite all the research I’d done before jumping into this project, even I was unprepared for the awesome experience of burning wood. Bottom line: I love it! Why? It smells like a campfire! Also, it’s kind of meditative. To keep the color even, I had to work deliberately and take my time. (Going slow and steady doesn’t come naturally to me at all. This was a great way to force me into Zen!)
It took me a while to get into the groove. I took comfort in the idea that if I messed up, I could just flip the piece and try again. And since this was my first time, I decided to embrace stepping out of my comfort zone. Even if it ended up terribly, I was trying something new!
But I love how the pieces turned out! My new office space in our temporary housing is a plain desk sitting in front of a blank wall. These pieces will look stunning on a gallery wall. I’m going to wait to hang them until I find other pieces to complement the gallery wall, so I know how long I want them to hang and in which arrangement.


Would you try woodburning? Let me know in the comments below! And if you have any fun DIY ideas that I should try (safe for super pregnant ladies, of course!), let me know.
As always, lots of love from my house to yours,
Cynthia
This is a sponsored conversation written by me on behalf of Hobby Lobby. The opinions and text are all mine.