How to Carve Monsters Inc Disney Wall Decor
“Alllllways watching!” Okay, okay, if you’re like me, you heard that “always watching” said exactly the right voice. I love Monsters Inc (like I love most Disney movies!) and Roz is one of my favorite characters OF ALL TIME. Speaking of favorites, this DIY Monsters Inc Disney wall decor is one of my favorite CNC projects to date. Keep on reading to learn how to make it!

How to Carve Monsters Inc Disney Wall Decor
This project was so, so much fun to make and honestly came along ’cause I needed a little more fun in my life. Between lockdown and everything changing, 2020 has been tough, y’all. Plus now that I’m working remotely, I’m falling flat on my face with all the tech issues popping up.
The IT guy at work is a big fan of Monsters Inc. So, I thought I’d make him a little thank you for never, ever judging me by the number of password resets I need. LOL.
Making this Monsters Inc Disney wall decor was a lot easier than it looks. Honestly, it was a piece of cake on my Inventables x-carve. (If you’ve never played with CNC machine, it’s so addictive! Check out my other recent DIY projects to see the possibilities.)
So how do you go about carving Monster’s Inc wall decor? Let’s walk through this DIY woodworking project step-by-step.
Step 1: Gather Your Materials
This project was super cheap and easy to make because I used scrap wood and materials I already owned. Of course, I’ve spent over seven years now gathering up materials and supplies, so I realize that’s easy for me to say.
If you’re new to woodworking, go slow and be patient with yourself! I’ll include the materials I used right below. Some of these links might be affiliate links, which means you’re keeping me well supplied with coffee when you use them. High five!
Materials Needed for Your Monsters Inc Wall Decor
- A sign backer. I prefer to use scrap wood for this kind of project. I had a random 5.5 inch by 7.5 inch piece laying around that was perfect for this. Or, if you want, you can grab a blank wooden sign on Amazon for pretty cheap.
- Wood carving tool. I used my Inventables x-carve for this project, which made it super easy and fast. You can definitely carve a wooden sign with a Dremel, too. I have a tutorial for carving by hand with a Dremel right over here.
- Cut file. Usually, I give away free cut files, but for obvious copyright reasons I can’t give this one away since it’s a Disney character. I’ll talk more about how I made this for my own personal use below. Or you can hunt online for one to buy.
- Bits. For this project, I used a 1/4 carbide straight flute from Inventables and a super cool Amana 30 degree v-bit.
- Stain. I always use Minwax Provincial. I just love it.
- Paint. I used an acrylic paint set that my mom sent me from Amazon. It has SO MANY COLORS and I think I’ll be well-stocked with paints until I’m a grandma.
- Sanding paper. I used 120 grit paper.
- Sander. I used my little Ryobi corner sander for this project.

Step 2: Create Your Design
For this project, I used Affinity Designer on an iPad Pro, which is my go-to app for creating vector files. I’m IN LOVE with using my iPad Pro and design 98.3% of all my designs this way.
Honestly, I have a brain block with using Adobe Illustrator. I don’t know why. I just find Affinity Designer so much easier.
I found an image that I liked, then used the pen and brush tool to trace it out.
Almost all of the fonts that I use come from FontBundles – they’re such great fonts and render beautifully on my signs. Plus, they’re always giving away freebies!

Step 3: Model Your Design For Your X-Carve
Once you have your SVG you’re going to want to upload it into Easel. Uploading an SVG is easy. Go to “file > import SVG”.
I hit “edit > select all” and always resize the SVG the size I want. Then I hit “edit > center to material” to make sure it’s even.
I also placed a rectangle over the entire image, then hit “edit > send to back” to lower the depth of the piece and effectively create a frame around the image. I could set the depth for all the different parts of the file to create different heights for the letters, Roz, the circle, and the details on her character. Playing with depths is a great way to add dimension to your piece.
Here’s how it looked in Easel.. Do you see all the different shades of grey and white? Those all indicate different depths for the carve.
Playing with dimensions is a really easy way to take your carves up a notch quickly!

Step 4: Pick Your Bit and Prepare to Carve
For this carve, I actually did two different carves – a roughing carve, then a detail pass. Doing a carve with two passes actually saves a lot of time. Why? You get to use a bigger bit to take out more material, then a detail bit to do the finer work.
To carve this Disney wall decor, I used a 1/4 Carbide straight bit for the roughing carve. Then, for the detail bit, I used a really pretty 30 degree v-bit from Amana tool. I’ve never actually used this bit before. Fellow carvers recommended it to me since I like to do intricate carves.
The 30-degree v-bit carves really well and the detailed lines came out deep and sharp.
For this carve, I changed the feed settings from automatic to manual. I’m still learning how to do this, and I read the Inventables forum and check in my Facebook groups every. single. time. I could definitely tell that my x-carve worked more aggressively on this carve than others. Bonus, though, is by adjusting the settings, you’re able to speed up the carve quite a bit. You can see my settings below:


Step 5: Carve!
This part continues to be my ABSOLUTE FAVORITE THING. It’s so funny, I got this machine to be more efficient with my workflow, but I find I just end up standing there watching the machine carve the whole time.
It amazes me literally every time that I can draw something out on the couch, watching my kids play, then carve it into wood the next day. Like what? And on a machine that I built? SO crazy.
Seriously you guys, if I can do this, I really think anyone can.


Step 6: Paint Your Monsters Inc Disney Wall Decor
Because the 30-degree v-bit carved such fine cuts, they weren’t easy to see in raw wood. While I knew the detail cuts would look darker with stain, I wanted the design to pop more.
So, I broke out my acrylic paints and got to work.
I get that painting can be really intimidating, and I don’t always get it right. But usually, I follow the same mental process each time I paint something.
First, I find the mid-tone for each area, like the middle shade of green for her body or middle shade of red for her sweater.
Second, I darken the shadows. Here’s a tip: whenever you’re mixing a darker shade to paint a shadow, don’t use brown. Use dark blue or purple. It’ll look more vibrant and less muddy.
Third, I pop the highlights. I mix a lighter version of the mid tone with white and paint it on where the area is lightest. To give the painting a little more dimension, I’ll also dab on some yellow in these areas, too, to look like the sun is hitting her.
The more you can get away without using black or white as your predominant colors, the richer your paintings will look. For reals.


Step 7: Sand + Stain Your Sign
Honestly, Roz looked pretty incredible on the raw wood. But I knew I wanted the whole sign to have a vintage worn and weathered feel. So off I went to sand and stain her.
To sand her, I used my little Ryobi sander that’s such a beast. It’s one of my earliest tool purchases and has been my go-to for these little projects. (And big projects, who am I kidding?)
Not gonna lie, I was NERVOUS to stain over paint. I’ve done it before (actually how to use stain over paint is THE most popular post on this blog), but I didn’t want to wash out the detail of the acrylic. Plus, acrylic is water-soluble and much more absorbent than other paints I’ve used in the past with this technique, like latex paint.
She turned out beautifully, though! I’m so glad I took a chance using this technique again. The stain wasn’t able to sink into the painted areas as much so the color dimension remained intact pretty well, albeit a slightly darker hue.
To stain, I always use Minwax Provincial because it’s my favorite. Why mess up a good thing? I do think she’d look really cute, too, with a weathered grey stain. Maybe something to try in a future project?


Easy DIY Woodworking Projects & Ideas for Beginners!
Unlock your inner woodworking enthusiast with our ultimate guide on Easy DIY Woodworking Projects – packed full of ideas for beginners!
Whether you’re a seasoned DIYer or just starting out, this guide has something for everyone.
From simple yet stylish projects to helpful tips and tricks, get ready to embark on a creative woodworking journey.
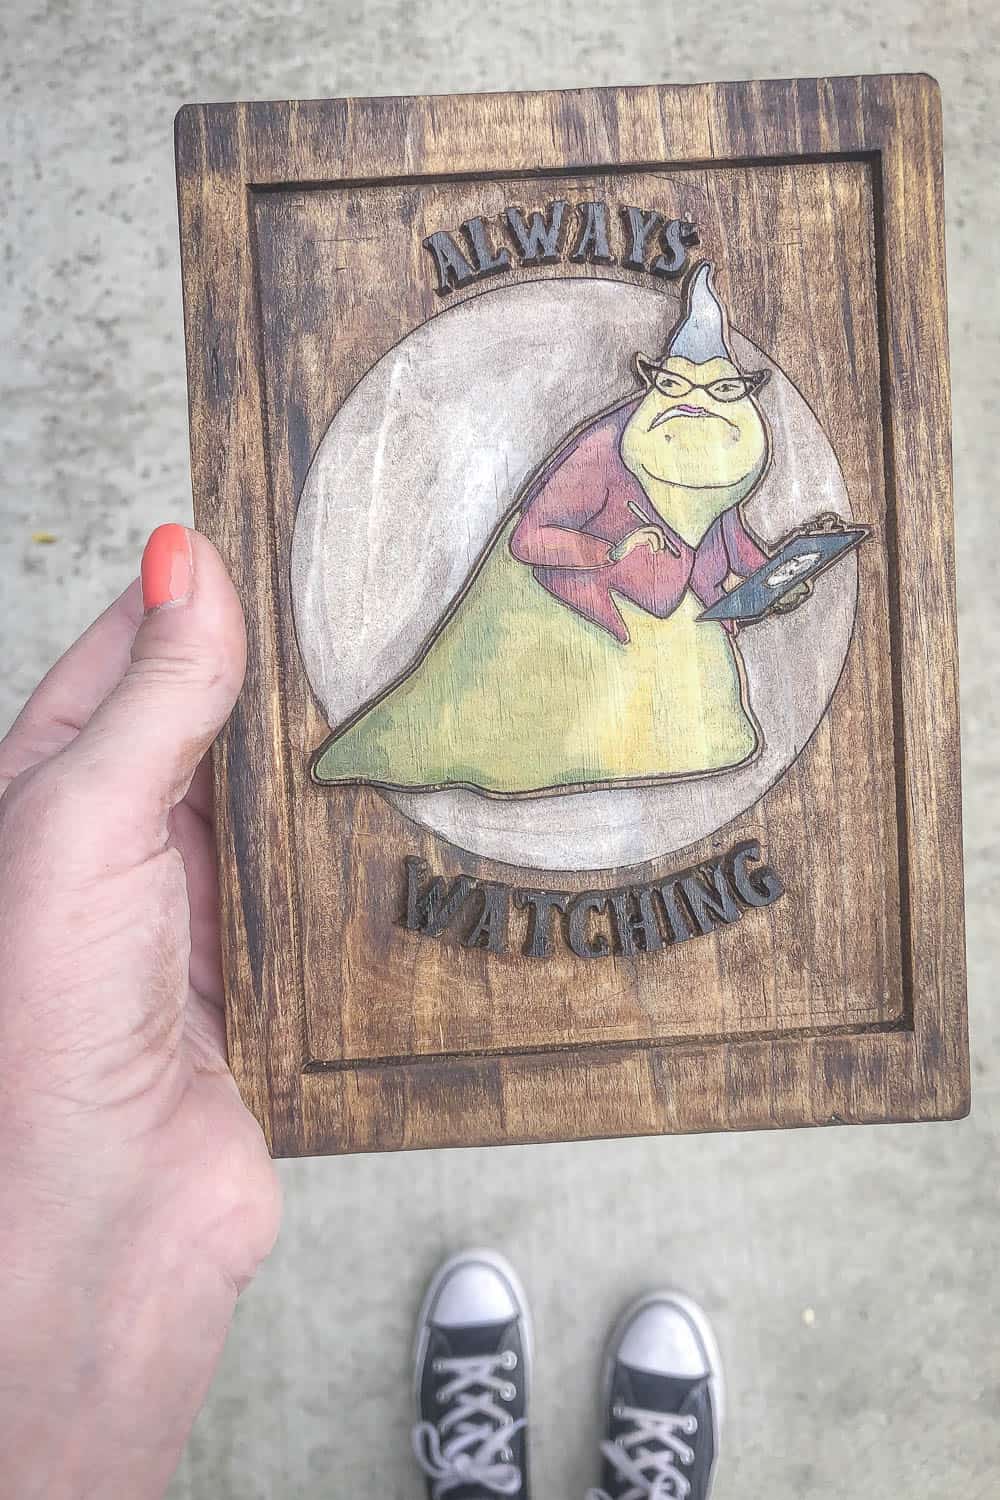
Ta-Da! Let’s See the Final Project
To say I’m obsessed with this little Monsters Inc Disney wall decor is such an understatement. I love her. LOVE HER. I hope the IT guy at work does too haha.
Here are some glamour shots cause she’s just so pretty:


So pop a comment below. Would you try this carved sign? Have you considered applying stain over paint before? Or have you done a two-phase carve with a roughing pass and detail bit?
I’d love to hear from you!
And as always lots of love from my house to yours,
Cynthia