How to Build a Garage Tool Bench
This post is sponsored by Rockler Woodworking – an awesome woodworking and tool company. As always, I’m only gonna share my absolute honest opinions with you all.

For those who’ve been following along for a little bit, you know that we just bought a new home with a super sweet workshop! The workspace is ahhh-mazing and I can’t wait to share more DIY and woodworking projects in this space. In order to knock out some of my projects, though, I needed a new tool bench.
See, here’s the thing: while I love me some sparkly jewelry, my husband knows that the quickest way to my heart is through tools. I love tools. Power tools, hand tools, benchtop tools, they all make me giddy with DIY inspiration.
I’d just gotten my hands on some super sweet Ryobi benchtop tools. Yep, I’m the proud mama of a drill press and bandsaw! But, I had nowhere to put ‘em in my new workshop. I knew, without a doubt, I needed to build a sturdy tool bench.
So if you’re looking for a new tool bench to get your workshop in top form, then keep on reading. ‘Cause this post is for you!
How to Build a Terrific Tool Bench
So, here’s the thing: when you’re using bench top tools, like any tools, you must must must be safe. And a huge part of safety is ensuring that the tools don’t move when ya use them.
Plus, if you want to ensure the accuracy of your cuts, guess what? Yep, you need to keep your tools secured to your bench.
I toyed with a number of ideas for securing my drill press and bandsaw.
Could I mount them to plywood and use clamps on my existing workbench? Sure.
Could I DIY a whole ‘nother workbench out of building lumber? Sure.
But I dismissed both of those ideas. Because I wanted a bench that was super sturdy, ideally metal. And didn’t want to spend forever building a bench because I just wanted to use my tools on other projects, like my daughter’s toy box and my son’s rocking horse.
So when the opportunity came up to collaborate with Rockler Woodworking, I knew I had an awesome solution.

The Best DIY Garage Projects and Ideas to Get Inspired!
Explore a world of exciting garage projects and ideas to revamp your space!
From DIY floor coating to organizing systems, find inspiration for a dream garage.
Learn how to hang wooden peg boards like a pro, use garage door lubricant effectively, and optimize your garage with smart storage solutions.
Transform your space and easily tackle projects using our top-notch tips and inspiration!
My Workshop Before
Here’s what my shop looked like before I assembled the bench. It’s clean (which was an enormous project unto itself!) but my new bench tools are just kinda sitting there. I really had no place to put them.


We’d just done a massive overhaul and created some amazing pegboard storage, which got a ton of tools up and out of the way. We also build some pretty fab shelving on the back wall, creating more storage.
After we’d cleaned up, we had a lot more floor space to work with. And right under the pegboard storage? It was practically screaming for a little tool bench.
Assembling the Tool Bench Frame
The bench comes in a variety of sizes. Essentially you get to customize the bench to get whatever size you want.
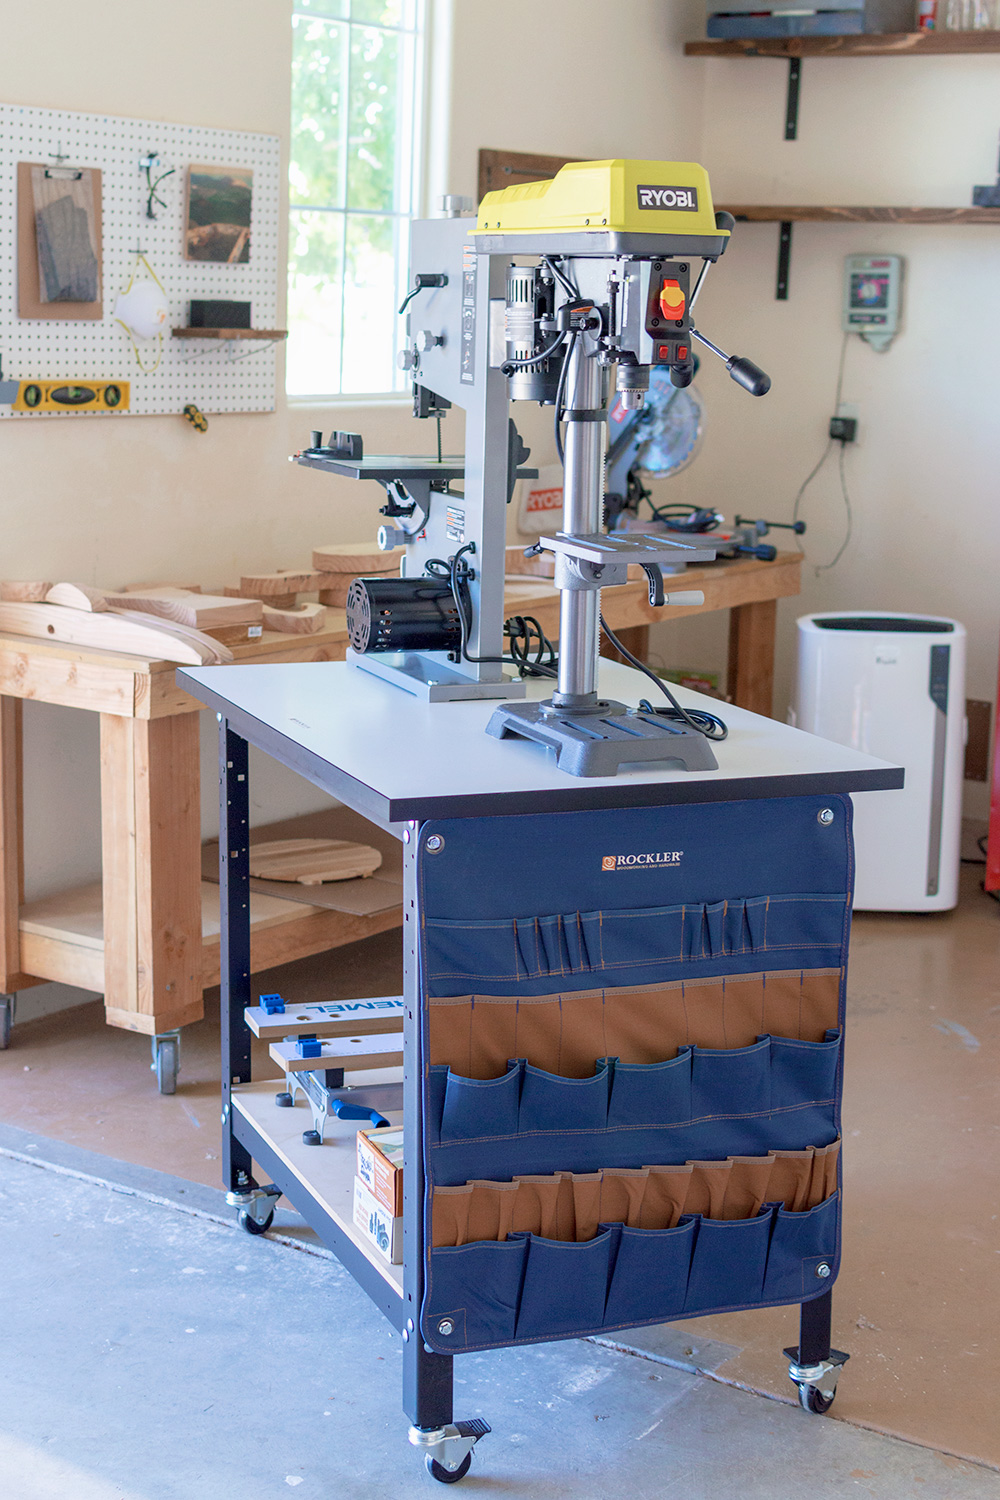
I chose the 24 inch by 36-inch shop stand. That size, I knew, would not only fit both tools well but also would work well in the space under the pegboard.
I also knew that I wanted the tool bench to have casters so that I could move it around. You know what’s awesome? I can even roll it out on the driveway and work in the sunshine, which is great.


The tool bench frame assembles really easily. Using a racket wrench, I tightened up all the bolts, following the instructions, which were honestly really helpful and easy.
I built the tool bench frame in stages, building the front and back, then connecting the side supports. While the steel is heavy and really sturdy, I found that I was definitely able to do this on my own, without any additional muscles to lift the pieces.
Once I had all the front, back, and sides connected, I could start to see the tool bench take shape!
Before going to the next step, I pulled out my carpenters square and checked all the angles for square. Then I added on all the remaining bolts and tightened everything up.


Adding the Casters and Top to the Tool Bench
In order to finish my tool bench, I needed to add the tool bench casters and tabletop. These two steps were actually surprisingly easy!
The casters went onto the legs without any difficulty. And what’s awesome about these tool bench casters , in particular, is that they can lock and unlock. So if I want to roll my tool bench away from the wall, I just unlock the tool bench casters and move it where I want it.
Then, I can relook the tool bench casters and that tool bench doesn’t move an inch. I definitely recommend investing in quality tool bench casters.
We DIYd our other bench and the tool bench casters are nowhere near as nice. In hindsight, we shouldn’t have gone cheaply on them.
The tabletop is 28 inches by 40 inches so it has a nice little overhang from the steel tool bench. The top is made out of solid MDF. It’s really stable and flat.
This particular tabletop is coated with melamine, which will ensure that it won’t mar any of my parts. Plus, if I happen to get glue on the table top, it’ll be easy to get off.
The tabletop screws easily into the tool bench frame from the underside using screws and a screwdriver.
Mounting the Tools and Adding Accessories
Once the tool stand was complete, mounting my drill press and bandsaw was easy!
I went to the hardware store to get strong bolts, nuts, and washers. And I made sure that the hardware would not only fit through the tools mounting holes but would also be long enough to go through the table. I ended up getting 3.5 inch bolts.
To be honest, I was actually a little nervous to drill into my pretty tabletop, but I didn’t need to be. I put the tools in the configuration I wanted, then marked the mounting holes using a pencil.
Then I set my tools aside and I used my drill and a smaller drill bit to first make a pilot hole. Then I used a drill bit the same size as my bolt.
Off my pretty new benchtop tools went on their new home. And you know what? Now that they’re firmly mounted in place, they’re not going ANYWERE. And I’m so so excited to use them!


Also, hey, don’t you love that tool bench apron on the side? I am crazy about it. It’s so functional and adds lots of extra storage in my shop.
For making rocking horses, I’m going to get some chisels for detailing. Pretty sure the apron’s going to be their new home.
I also added a piece of MDF on the bottom to create a shelf. Right now, it’s holding the small parts kit for the dust collection system I’m about it set up.
My mind is honestly blown by how nice to tool bench looks. Not only that but it was so easy and fast to assemble and adds an incredible amount of storage and functionality to the shop. Score!


So pop a comment below. Are you in the market for a new tool bench? What are the important factors for you when figuring out what kind of tool bench to build? And if you’re in the market for a tool bench, be sure to check out Rockler Woodworking. They’re an amazing company and I seriously LOVE the quality of their products!
As always, lots of love, from my house to yours! Cynthia